Sage Export
To run the Sage export
The following steps continues from installing and setting up the extension. After the export, do the following:
-
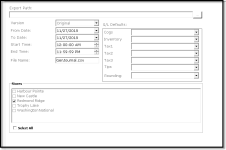
In the Extension module, select the Sage button. The export screen for Sage displays:
-
At the end of the Export Path field, click the Ellipse (…) button and navigate to the folder to export to.
-
In the Version drop-down, select the Sage version you are working with: Sage 50 or 300 or Original.
-
Select or enter the date in the To Date field.
-
In the Source field, enter a name for the source of this export.
-
In the Comment field, enter any other needed-information about this export.
-
The filename is pre-named in the File Name field, but you can change it if need be.
-
From the G/L Defaults, select the Cogs and Inventory that you want to export from those respective drop-down fields.
-
Click the Export Gen Journal button. The CPS.Sage dialog box displays a message that it is complete.
-
Click OK. The .csv is now available in the folder you selected in step 2.
Export using Sage
If you have not set up to export Sage data yet, go to Accounting and Extensions and then Sage Export to run the export on this short and over date.
To see a video on this, jump here>>
