Creating Quick Sale Buttons for the iPad running CPS Air
Overview
For your iPad running CPS Air, you have two options on how to create buttons for it:
-
Selecting the iPad at the Sales creator screen in POS Express before you start creating the buttons
-
Copying the buttons from another terminal's Sales screen
Tip: The iPad works best with buttons set up with a row of 5 across and 5 down.
Creating the QSB for the iPad at the Sales creator screen in POS
You can create your QSB for CPS Air in POS Express in the Quick Sales Button Setup screen. However, you must select your iPad at the terminal before you get started so that the buttons are created for the CPS Air on the iPad. Also, you must remember that you are creating buttons ONLY from the Page 1 of the Quick Sales Button Setup screen.
To see a video of this, click here>>
Note: You can do this on any terminal running POS Express.
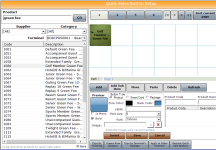
- Select Tools | Options | Sales Options | Quick Sales Button Setup. The Quick Sales Button Setup screen displays.
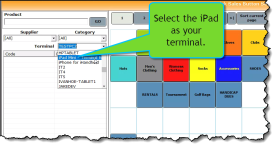
- From the Terminal menu, select the iPad terminal.
Tip: Because you don't have the Page option for the iPad, you might want to start creating sub-pages first. You can have some buttons on the first page if needed, but to organize the sales, you should use the Add Sub Item button.
In the left panel, search and locate the item for which you wish to make a button. You can filter by product name, product code or description. The search results display in the left panel below the search tool.
Click the item to select it, and drag it to an empty square on the right. The square is how your button will display on the screen.
Use the toolbox at the bottom of the screen to [change the appearance] of the button. For more details, hover over each option in the image below or click here>
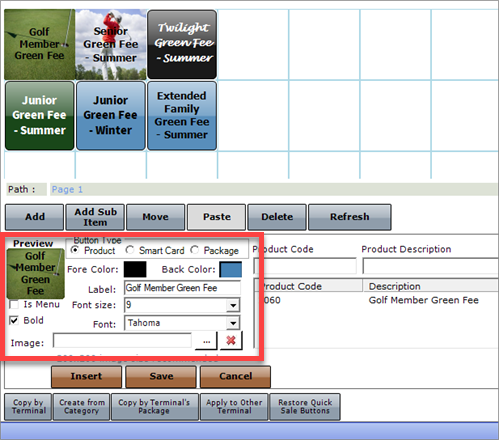
Fore color: Click to change the text color of the button.
Back color: Click to change the background color of the button.Label: Use this text box to change the button text.
Font and font size: These fields allow you to change the text style and size.
Image and the "..." button: Click the "..." button to navigate to an image on your computer and upload it. The red x button deletes the image.
Select the Save button to keep your changes. The new buttons and sub items update on the iPad after you reconnect.
Note: After you finish customizing the buttons, you can apply these settings to another iPad or multiple iPad terminals using the Copy By Terminal button. See the Copy topic.
Copying Quick Sale Buttons to an iPad running CPS Air
You can do this from any of your PCs running POSExpress, but make sure you have the desired PC with the Page 1 set up in the Sales screen exactly like you would want it on your iPad running CPS Air.
To see a video on how to create Quick Sale Buttons in CPS Air, click here>>
To be guided through an interactive tutorial, click here>>
From any terminal with POS Express open, go to Tools | Options | Sales Options | Quick Sales Button Setup.
Click the Copy Terminal button at the bottom left of the screen. The Copy Quick Sale button window displays.
On the left, select the terminal from the Copy From box which you previously customized (see above) or another terminal keeping in mind that you'll only copy Page one of this terminal's Sales screen. The number of buttons for that terminal display at the bottom of the Copy From box.
On the right, select the iPad that you wish to copy to. Most likely the name will contain the word iPad in it.
Select the Continue button. A confirmation screen displays.
Click Yes to confirm but making sure that you have selected the correct terminal.
Now go to your iPad, start CPS Air up, sign in, and open up the Sales screen or reconnect. Notice that the Sales screen contains the same Quick Sale Buttons that Page one of the Sales screen from the terminal that you copied from.
Note: There is no way to delete or change buttons on the iPad so if you need to change them, go select the iPad terminal in the Quick Button Sale Screen setup screen in your POS Express and make your changes there. Make sure you reconnect the iPad after you have saved.
 menu | Connected | Connect.