Customer Module
The customer profiles hold information such as contact information, payment methods, and other individuals who have been added to a customer’s account. It also stores the customer’s purchase history and activities at the starter hut.
Navigating or opening up the Customer module
In POSExpress, logged in as someone with the appropriate permissions set, it all starts here:
-
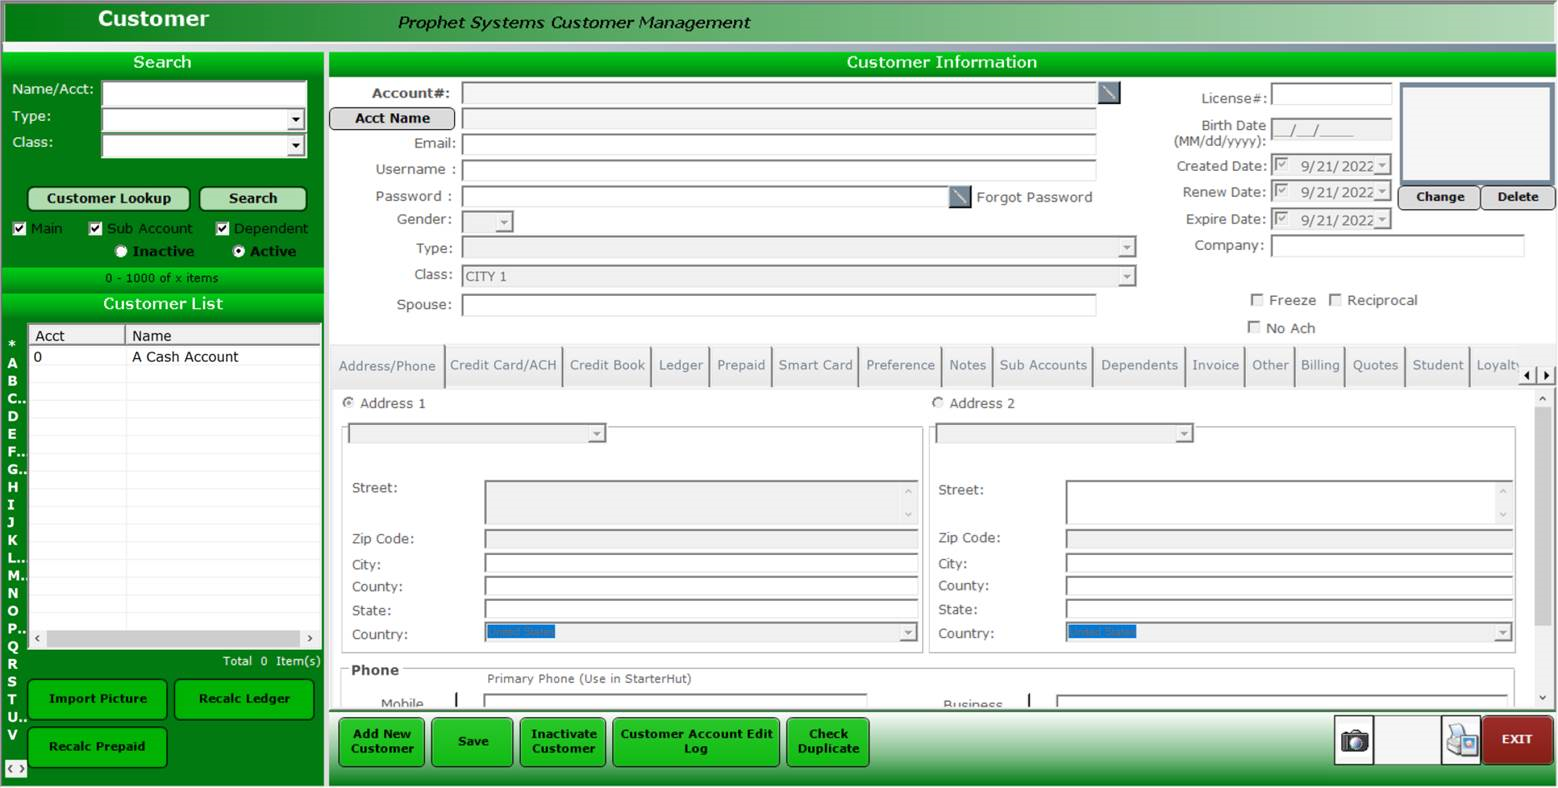
Go to the Customer module. The Customer screen displays.

Customer Search
You can use the search section to do a customer look up in the Customer module in several different ways as follows:
Membership Card Swipe
If you are set up to use membership cards, swipe the member's card and the customer screen populates with the member's information.
Note: You may also swipe a membership card from the Sales and Starter Hut screens to look up customers who are members and carry the card.
Alphabetically
-
To pull up an alphabetical list of all customers, select the asterisk (*) from the top-left part of the list:
Last name
-
To search by last name, click the letter the last name begins with and the software will populate a list of all members whose last name starts with that letter.
Any part
-
By typing in the name or part of a name, of a customer into the Name/Acct. and selecting Search, the software will populate any members with this text anywhere in their first, middle, or last names.
For example, if you enter Tim, the list will include anyone with the first name of Tim, to customers with the last name of Timbers, and anyone with ‘tim’ anywhere in their name.
Filter Customers - Narrow your search
Searching can be narrowed down by selecting a Customer Type and/or Customer Class from the drop down menus, as well.
Note: These types and classes that were created in Options -> Reference Tables -> Customer Class & Customer Type.
Filters enable you to find customer profiles quickly:
- Search field: At the top left, the search field seeks profiles by: customer type, customer class, store code, or sub account.
- Active / Inactive: Located under the Search field, the Active and Inactive buttons are a good place to start when you want to reactivate an account for an inactive customer, such as when former members want to renew their membership.
Add a New Customer Account
In the Customer Module, scroll to the bottom of the page and select the Add New Customer button. The Add New Account screen will open and allow you to enter customer data to create a customer profile. Important: Select the Save button at the bottom of the screen to ensure your additions and edits are saved in the customer profile.
Customer profiles contain the following information and settings:
- Customer Type: The Type field is often used as a filter for different groups, such as Class I, Class II, Past Due, Event, etc. The default is Tee Time/Cash Only, usually used to classify walk-in golfers.
- Customer Class: The Class field controls Tier Pricing (member discount settings, which can be changed under Booking Rules to set where and what tee times the discounts apply.) The Class data is useful for reporting purposes and it can be used to tie a member account to a billing cycle.
- Customer Basics: The basics include the Renew Date field, Created Date field, Freeze Account check box (typically not checked), Reciprocal check box (designates customers from partner clubs or with shared membership from another course.)
- Address / Phone: Information is listed first, by default.
-
Credit book: This provides a line of store credit. It is used to transfer tournament prize winnings to the account of the winner. The value of the credit book is usually applied to green fees and general pro shop purchases and is generally restricted on alcohol and certain brand-name items in the pro shop.
- Ledger: This shows the customer’s payments, debits, and credits.
- Prepaid: This balance is paid up front so that customers can draw from it for purchases, similar to a gift card. The prepaid field cannot have a negative balance.
- Private Club Billing: Enables monthly membership billing for clubs. Sends bills for member dues all at once.
- Smart Card: The smart card is a punch card that rewards customers with extra tee times after a certain number of purchases, such as, receive 10 tee times for the prices of 9. The “Move Quantity” option allows you to transfer smart card usage to another customer. You may use the "Add and Subtract Quantity" option to adjust the smart card value. Smart cards are purchased up front, similar to any inventory item, and the system will track how many times it is used.
- Preference tab: This is an area that can store clothing sizes, shoe sizes, glove sizes, handicapped fields.
- Groups: Set up leagues under the Groups tab. It allows you to block off tee times so they are only accessible to people in a certain group (e.g., Junior, Seniors, etc.)
- Sub Accounts: This allows you to set up family members under one main head-of-household account. Any charges under a subaccount will roll up, so the family receives one bill. Under Add a Sub Account, there is a check box labeled “Don’t roll up charges to main account” and, if checked, the main account will only be charged membership dues while other charges will go to the subaccount. Other areas may also assist you with family accounts. The Dependents tab is an area for notes about family member names and preferences. The Shared Smart Card Acct tab can allow family members to share smartcard usage. The Shared Prepaid Acct option facilitates a shared fund for multiple family members on the same account.
Archived Customer Module
For a complete archived guide of the Customer module, click here>>