Rates in StarterHut
When there are multiple green fees and extra charges for carts and caddies, it is important to understand how to apply rates to a tee sheet.
In the Inventory module, you may enter a variety of rates to suit all types of golfers and your various business needs. You must complete the rate setup process, and establish product codes, before proceeding with applying rates to a tee sheet. Go to Set Up Rates for instructions.
How To Apply Rates To A Tee Sheet
Once set up, the rates will allow you to sell tee times, cart reservations, and other fee-based services directly from the tee sheet in StarterHut. This page will walk you through the process.
Before You Begin
Have a list of each Product Code related to the tee sheet that you entered under the Inventory module. You will enter Product Codes in StarterHut.
Step by step:
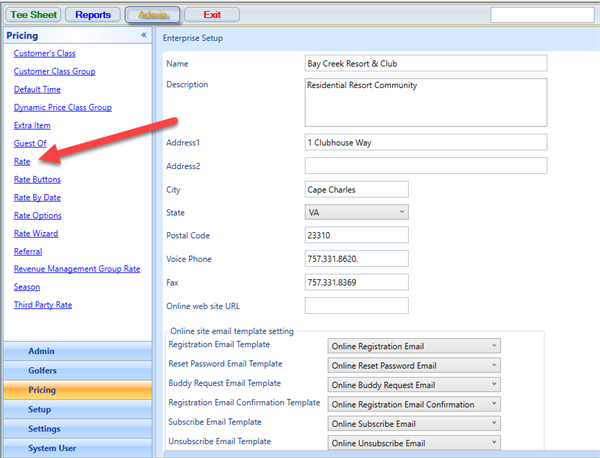
- Open the StarterHut module and select Admin. At the left, select Pricing > Rate.

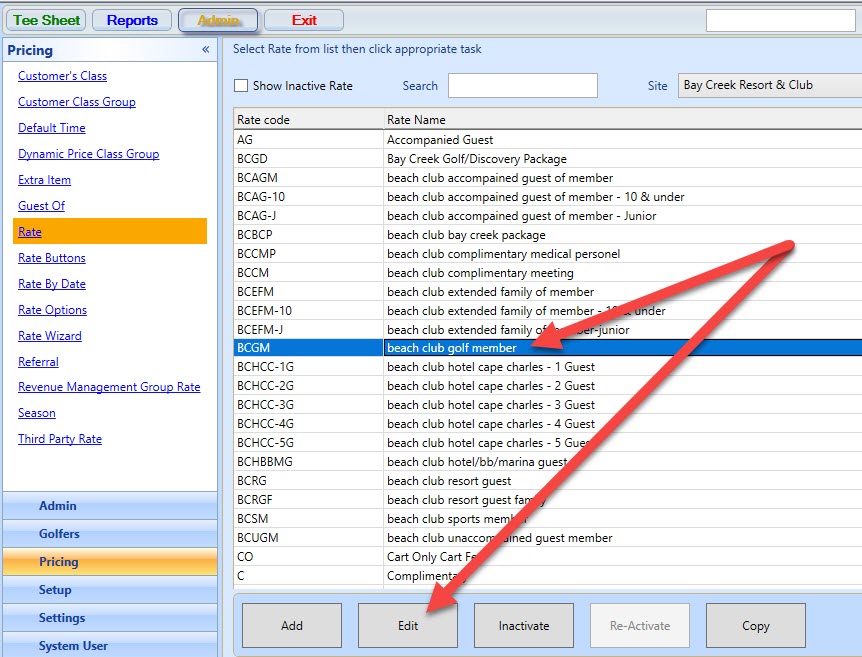
- A window displays the rates in your system. Select a rate and then the Edit button.
Alternatively, you may select Add at the bottom of the screen to create a new rate.
The Manage Rate Information screen opens to display the fields needed for a rate.
- Review the rate criteria for the following fields:
Rate Description: Enter a name for the rate, such as Regular Rate, Junior, Senior, etc.
Site: Select the site of the course.
Course: Select the name of the course.
Color: Select a color of an overlay. You may wish to assign colors if you offer different pricing at various times of the day, so pricing is easy to see. The Turn Color is the setting for marking the crossover point at the middle of the course.
Rate Code: Create an abbreviation for your rate, such as "Reg" or "Rack" for a regular rate. - Now you will apply the rate to your tee sheet, using the Item Code field. First, pick one of the following Item Code options:
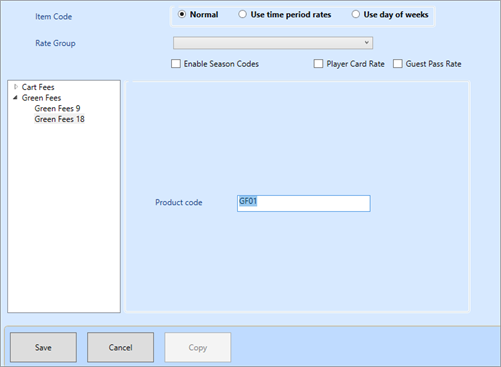
• Normal: Select the Normal option, if your rates are the same regardless of time or day.
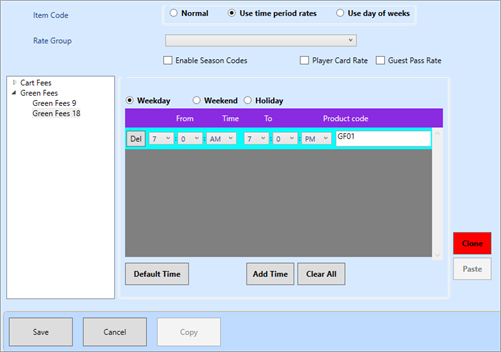
• Use Time Period Rates: Select the Use Time Period Rates option, if rates vary by the broad, general categories of Weekday, Weekend, Holiday.
• Use Day of the Week Select the Use Day of the Week option, if rates vary greatly by day and time of day. This option permits a highly customized tee sheet with many varying rates - If you would like to set different In Season and Off Season rates, select Enable Season Codes check box. Leave the box unchecked if you do not wish to enter different rates for the off season.
- With an Item Code selected, you will now apply the rate for time periods on your tee sheet. To do this, go to the white box at the lower left. Select Green Fees and then select Green Fees 18 (18-Hole course) or Green Fees 9 (9-Hole course).
The rate's Item Type selected in the Inventory module will cause it to appear in the Product Code field.
a. If Normal is selected under Item Code, enter the rate's Product Code into the field. Select Save.
b. If Use Time Period Rates is selected under Item Code, select the options to which the rate will apply for each time period. Select Save.
Use the Clone and Paste buttons to copy and paste the settings for one time period to another.
c. If Use Day of the Week is selected under Item Code, select the options to which the rate will apply for each day of the week. Select Save.
Use the Clone and Paste buttons to copy and paste the settings for one day to another.
This step could potentially take a long time to complete. It all depends on how many rates you use and how much the tee time scheduling changes each day. However, once setup, your time sheet will automatically apply rates and fees. Overall, your sales process as golfers check in and pay for their rounds will be quick and easy. Although the rate setup process is time-consuming, it will be worth it.
After you have applied all rates and selected Save, you may select Exit to leave the StarterHut module.
For a refresher on tee sheets, visit Tee Sheet Setup.