Job Classifications
In the 3.100 release, you can add job classifications in our new Online Options. You can now set this up online instead of in the terminal-based CPS software. This means you don’t need to be logged onto a computer, and you only need access to the Internet and a browser.
Note: This feature will work with the CPS version on a terminal.
-
Go to the Online Options site and log in as an admin or with the proper permissions.
-
Under the Hamburger menu, select Options | Security | Job Classifications. The Job Classifications page displays to the right.
-
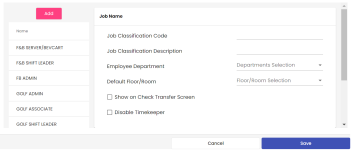
Select the Add button. The Job Name screen displays to the right.
-
Enter an alpha-numeric code into the Job Classification Code field in the first field; this is required.
-
In the second field down, enter a descriptive name for this department in the Job Classification Description field.
-
From the Employee Department drop-down, select the department for this job classification.
-
From the Default Floor/Room, select the default floor or room for this job classification.
-
Check the Show on Check Transfer Screen box to show this on the check transfer screen.
-
Check the Disable Timekeeper box if you do not want to use Timekeeper.
-
Select Save when done. The pop-up remains, and the new classification is listed under the Name header.
Note: To remove a department, select it from the list and click Remove Classification.
Related Topics
-
To learn more about job classification and how to set those in CPS v3, click here>>
