Multiple Merchant
In 3.104, we added support for using multiple merchants to ProphetPay. So you can now enable and set up separate “accounts” within your system for money coming into your facility. In addition, we’ve added a new reporting feature for you to keep track of your multiple merchant accounts, called MerchantTrack.
Note: Only Magtek devices can be used with Multiple Merchant, you cannot use chip readers.
Examples
You can think of your stores as merchants as you read these examples.
-
When you turn on multiple merchant, it could allow you to have your food items in your inventory go to one account and then your golf items into a separate account. So, a merchant account example would be your F&B, and another would be your golf management. Like a separate bank account - a different account for the money to go to.
-
You may want a person set up to channel the money to, like Bob Smith, who owns the club but not the golf shop. So for example someone plays 18 rounds of golf and buys golf balls. The sales categories will determine which goes to which merchant, Bob Smith gets the 18 rounds money and the golf shop gets the golf ball money.
To set up Multiple Merchant
Overview Steps
-
Create a profile in the credit card admin site, CCMv4. Note: This step is usually done by a Club Prophet support agent during your initial setup.
-
Link POSExpress to the new Multiple Merchant profile in Options.
-
Set up categories in Options of POSExpress. In the Sales options, you’ll assign items to the merchant's credit card profile.
Note: You MUST set up the credit card profile first! Everything needs to be set up on the credit card side before setting up multiple merchants. In most cases, the credit card team will set up the credit card module site before the multiple merchant profiles.
To set up a profile in the Credit Card module admin site
The following could be set up by your IT department if you have one; otherwise, call our most excellent support staff at 1-800-793-1872 or email us at support@cps.golf.
-
Go to the Credit Card admin site.
-
Log in as the admin.
-
Select Credit Card Profiles Setting.
-
Select Edit to the right of the terminal/profile you are updating OR select +Create New Profile. The Edit Profile screen displays. Note: Most credit card processing will be handled by ProphetPay; make sure you select a profile with ProphetPay under the Interface Type column unless this is NOT a ProphetPay setup.
-
If creating a new profile, enter the following fields:
-
Profile Name - Enter a descriptive name; it will appear in the POS drop-down. See steps below.
-
Select the User Tips checkbox.
-
Interface Type: ProphetPay is the selection for most of our customers. TSYS and the other choices will soon be gone except for Moneris, which isn’t an option for muliple merchants.)
-
-
Select the Support Multiple Merchants checkbox. The Manage Merchants button displays.

-
Select the Manage Merchants button. The Merchants screen display which is the interface to create each merchant.
-
Select the +Create New Merchant button, and enter the following:


-
Merchant Name - This is a descriptive name of the store or person, bank account, or merchandise bringing in sales.
-
Merchant Identity - Enter the merchant identity.
-
Merchant Identifier - In the Prophet Pay Setting box, enter the identifier of this merchant.
Note: The above two entries are created by the CC team or Fullsteam during the customer's account creation using Fullsteam's reporting website.
-
Select Submit.
Note: If you are going to set up your POSExpress credit card options next with this new profile, you can copy the User Token information before you close out here by selecting Edit Profile, then copy the Token Auth field information.
- To create another new merchant, repeat steps 6 - 8 above.
-
When you are finished, select Close in the lower-left corner.
As long as the profile of the merchants are setup, you can proceed to the next steps below in POSExpress.
To set up multiple merchants in POSExpress
To link inside POSExpress to the new Multiple Merchant profile, do the following:
-
Log into POSExpress with permissions to make changes to the credit card setup.
-
Select Tools | Options.
-
Select the plus sign [+] to the left of Credit Card / Gift Card / ACH.
-
Select Credit Card. The Credit Card screen displays.
-
In the Credit Card Integrations section, make sure the CPS Credit Card Module v4 is selected. Note: Unless you have a version prior to 3.104 or are a Moneris customer, the CPS Credit Card Module v4 is your only option.

-
In the CPS Credit Card Engine v4 (Support PA-DSS v3.2) section, fill in the following fields:
-
Host - the URL to your credit card admin module; this is where your profile was created above.
-
User - this is the username you use to sign into the credit card admin site (host).
-
User Token - This code will be unique for each customer/user - support agents can find it in the Call Log, or you can find it in the Edit Profile screen of the CCM (Credit Card Module admin site from the above) from where you copied it in between steps 10 and 11 above. If you did copy it, you could paste it into the User Token field now.
-
Select the Refresh Profile List button first, then select the new profile you created above from the Profile drop-down list. Note: As soon as you select your Multiple Merchant profile, the system can do multiple merchants now.
-
-
Select Save. An Authorizing Transaction status pop-up displays.
-
Select Close when the pop-up disappears.
Note: Once the above is enabled, make sure to set up all of the categories so the software knows which category should have what merchant.
Setting up Sales Categories in POSExpress
Every category will not need to be set up with a merchant account if you want to sell everything to credit cards. You do this in the Sales Categories screen by assigning categories to merchants’ profiles by doing the following:
-
In POSExpress, log in with the correct permissions to make changes.
-
Go to Tools | Options.
-
Select Reference Tables | Sales Categories. The Sales Categories screen displays.
-
To edit an existing category, double-click the category. The category screen displays.
-
Scroll down to the bottom of the page, and select the Merchant drop-down button.
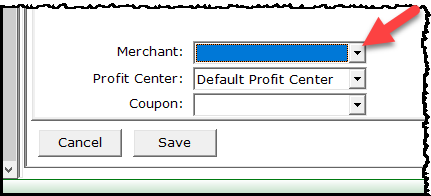
-
Select which merchant you want the items in this category to go to. Note: The merchants appear because of the setup steps. If you’re merchant profiles are not appearing, try exiting POS and starting it up again or reviewing the setup steps above.
-
Select Save. The screen closes.
-
Repeat steps 4-7 above for each category you need to separate into merchant profiles.
-
You can close the Sales Categories using the Close button in the lower right corner.
BEST PRACTICE: Immediately restart the software on all terminals using Multiple Merchant.
Now you can sell items belonging to these categories, which will be placed in the correct merchant profile.
Note: After selling items, you can check to ensure that the sales are processed correctly using the Sales Lookup screen. Also, if you are using ProphetPay, you can use the MerchantTrack module to look up and trace credit card sales per merchant. MerchantTrack is the portal to all things reporting that takes place for each of your merchants. After you are set up to see and run reports, you’ll launch MerchantTrack from the Online Options. To learn more about MerchantTrack, click here>>. One of our excellent support agents can help you with that setup, or go here to see how.