Value Packages
This feature contains a new daily deal option, that when applied to a tee time lets the person booking the tee times choose a package that can be selected from a predefined-list. Once the backend is created and the tee times are assigned the deals, the Value Package deals displays as the Daily Deals do. There are three main steps to Value Packaging:
-
Setting it up in Inventory
-
Applying the deal to Starter Hut
-
Using it online and locally
To set up the package in Inventory
First you create the packages in the Inventory module that will be used as the value-added options, Next you would use the packages in the Package tab.
-
In Inventory, select the Packages button at the top and towards the right of the screen.
-
Select Add New Package at the bottom-left of the screen.
-
Enter your set up information in the following fields:
- Package Code: This is what the package is listed as within the Daily Deal Setup. Enter something that you can search for easily.
- Package Name: This is the name that your customer or staff, in the case of a local booking, will see listed in the pop-up box when booking a tee time (online or locally). Make this a short descriptive name.
- Description: Enter a description of this package; you could spell out what is in this package and the set price, etc.
- Item Code: Start typing a known item code or name into the field. A list of items display from which you can select. The price populates the Price field and will be the price your customer sees.
- Golf: To the right of the Item Code, select this drop-down field to select an image that will display on your tee sheet when this value package is selected.
4. Select Add Item after each item that you add to this package.
Note: Select the Ignore Manual Price checkbox for this item when you want to suppress the manual price pop-up box at the time of the sale. This would be set in the Advanced tab under the Pricing sections for this product's settings.
5. Repeat step 3 to add more items to this package, always clicking Add Item after each item you search for and find. The items are listed in the Package Item list table.
6. To set a different price for this package, select the Update Package Price button. The Select packages to update screen displays. Do the following:
a. If your package(s) are not checked, select those now.
b. Do one of the following to update the price for the package:
- To update the package price by an amount that will add or subtract from the current price, select the Modify package price by radio button and enter your amount in that field. Note: If you are wanting to give a discount, make sure you enter a minus sign (-) then your amount. For example $10 from a $50 package, you would enter -10 and press Enter. The field now contains your number with parenthesis around it, like this: ($10.00).
- To update the package price by a fixed amount that you have determined, select the Set package price to radio button, and enter your amount in that field. So for example, you see that the package would cost $109 and you want this package to be $100 so you enter $100.
7. Select Update. The Total Price field in the lower right-corner updates to the new price.
8. Click Save when you are finished adding items to your package. Your package is visible in the Search & Package List to the left.
Tip: Select Clone Package to reuse a previously made package to alter it in order to make a new package quickly.
8. Exit Inventory.
To set up the Value Package deal in Starter Hut
The Value Package deals are added like Daily Deals. This is done by selecting the Daily Deals button within Starter Hut and selecting the Value Package button. A built-in date wizard helps you select a date range, time, and course to apply to the package at booking time.
Note: Make sure your tee sheets are built out to cover the date ranges you'll be using before walking through these steps.
- In Starter Hut, with a tee sheet template opened, click a cell or cells at a selected time slot. The cells highlight and the General options display to the right.
- Select the Daily Deals button in the middle of the General tab to the right of the screen. The Daily Deals window displays.
- Select the Value Package button in the middle of the screen. The wizard opens to the Time Selection screen.
- Enter the needed information for each of the following screens. Click Next to move to the next screen:
- Time Selection screen - allows you to use the currently selected tee times for the deal time range or you can select a different time range by clicking the Tee Times button and entering the new time range in the Start and End drop-down fields below.
- Course and Date screen - allows you to select which site/courses the deal is going to be applied. The start and end date are also set here.
- Days Selection screen - allows you to select what days in your range (set in previous screen) the deal will be applied to. Do ONE of the following based on your needs:
- Click the General tab - your available options are Every Day, Every Weekend with an checkbox option to set Friday as Weekend, Every Work Day.
- Click the Weekly tab - select one or more of the days of the week so that this value package is available on your selected days.
- Click the Monthly tab - if your date range which you selected in the Course and Date screen covers a monthly range, select which dates in that month that this value package is available.
- Booking Information screen - allows you to add any and all packages that you would like the customer to choose at the time of booking a tee time.
- Click Go to display all available packages.
- Double-click the package in the box below the search field to add it to the right.
- Anything typed in the Note field will display on the tee time cell both online and locally on a terminal.Example: Limit this deal to 9/18/Any Holes.
Caution: A customer can only select ONE value package at one time.
Note: You can edit a Value Package by selecting the cell and selecting Edit Daily Deal from the menu to the right.
- Click Finish. A message displays that reports that the software attempted to apply the selected days, and the number of successful days and you will be notified if there were any failures. If there are failures, you will see a little chart showing what days failed so you can go to that day and see what is going on.
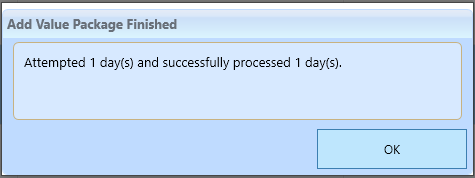
- Click OK. The selected tee times display on the cells with the new Value Package label.
Note: To remove a Value Package, click Remove Daily Deal in the right-bottom part of the screen.
Once the backend is created and the tee times are assigned the deals, the Value Package deals will show online or locally as other Daily Deals do.
Booking a tee time with a Value Package add-on
When a tee time is booked, it will look different in the three different places:
Online Reservations
- Select the time square on the screen. The Select Players and Holes screen displays.
- Select the Number of Players and the Number of Holes (if available).
- Select Next. The Value Package(s) that were previously set up displays.
CPS Air on your iPad
1. In Starter Hut, with a tee sheet opened, select the tee time cells then select Reserve. The value packages The Value Package(s) that were previously set up displays.
2. (Optional) Enter the name(s) and email address(es).
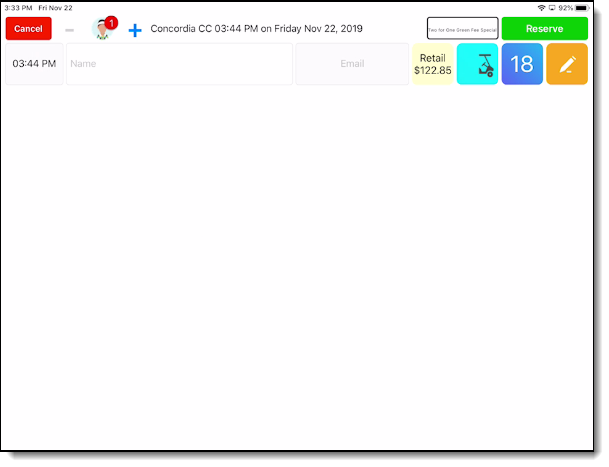
3. Select the Reserve button in the top-right corner of the iPad screen. The tee time cells highlight with the reservation.
Sales screen in CPS
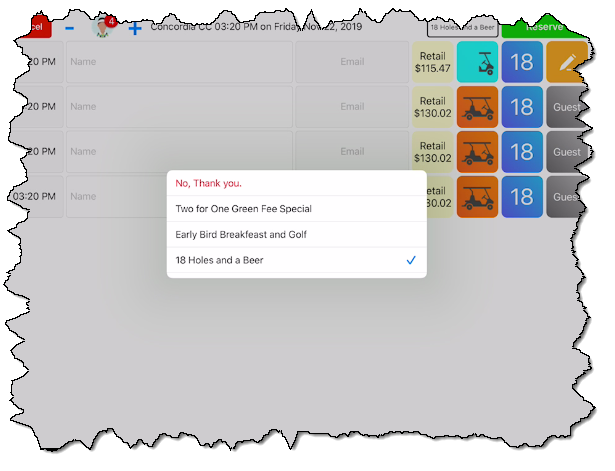
In Starter Hut, after selecting holes and players, a pop-up window displays, when someone selects a tee time with a value package modifier asking, “Would you like to upgrade?”

The parts on the Value Packaging pop-up screen:
- The top left displays the Date/Time/Amount Per player for the selected tee time.
- The middle section lists all packages added during setup, listing the add-on price to the right of the package description.
- The No, Thank You button allows you to book a tee time at the standard rate.
- The Back button will cancel the booking, release the tee time, and returns back to the tee times sheet.
- Select the Select button to apply the Value Package. The label Value Package displays on all the tee time cells that were selected. OR When a Tee Time is made the tee time cell info is populated to show what package was selected with the tee time in the product code field.
- Tee Time Check-in: When checking the tee time in, the value-added package is broken out to their color-coded parts. Note: If food with modifiers were required, you’ll be prompted at this time to add those.
- Checkout: When a Value Package is selected, at the time to Finalize Sale, the checkout screen will reflect this on the checkout summary. In the note field on the top left lists, the name of the package selected.


Note: Booking a tee time online works the same way with a local CPS terminal and local bookings too. If created and someone wants to book a tee time, they will see the prompt with the Value Package add-on pop-up, asking if they would like to select that for the tee time.