How to set up a kiosk to gather customer data
Quick Overview
Set up your kiosk to gather data from your customers
- First, you create a “give-away” offer in the Options screen.
- Next, you decide on what customer information to collect from this offer.
- Then, customize the emails and the limits on the offer and whether you automate or approve the offer for the customer.
- Make this kiosk available online, or on a local PC terminal via POS Express or both.
The process of the kiosk exchange with your customer
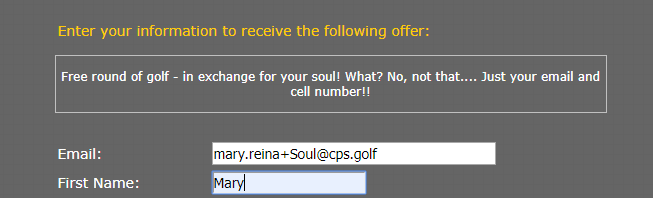
- Your customer would then find a prompt for an offer at a kiosk.
- They would enter their email which triggers an email to be sent to them with a link to a site where they would enter their data in exchange for the offer.
- They click that link and enter the information required.
- After they have submitted their information, a coupon or barcode is emailed to them for the offer.
- They bring the coupon or barcode to the shop or your restaurant to redeem the offer.
- You have them in your customer or player database.
To set up your kiosk
- Select Tools | Options, then select the plus sign [+] next to Kiosk Options. The Kiosk Options expands to reveal the options below it.
- Select Kiosk Data Collection Options. The management screen displays to the right.

- To add a new offer, select Add from the right side of the screen. The Kiosk Offer Information screen displays.

Note: You cannot enter anything into the ID field; it is populated by the system after you save this offer.
- Enter the number of days this offer will expire in the Expire in box.
Note: Enter negative one [-1] into the field for the offer to never expire until you change it.
- From the Store Code drop-down field, select the store for which this offer will be available.
Note: Select the Current Offer by Store Code checkbox to make this an offer in each of your individual stores.
Example: If the Store Code is set to your pro-shop, and the customer tried to redeem the coupon at the bar, the system would not allow it.
Note: Leave it blank for the offer to be available for all stores.
The Product Offer
- In the Product Code [1-4] fields, enter the product code(s) for this offer. This code will be responsible for generating the offer code and barcode for the redemption of the offer which will be sent in the email. The product or offer should match the text description that you enter in steps 10 and 11 below.
Note: You can offer up to four different products, but all four of the items will need to be redeemed at once; the customer will not have the ability to pick which product they get.
Options to gather from your customer
- Select the Customer Option tab, and check all the options that you want to collect data for.
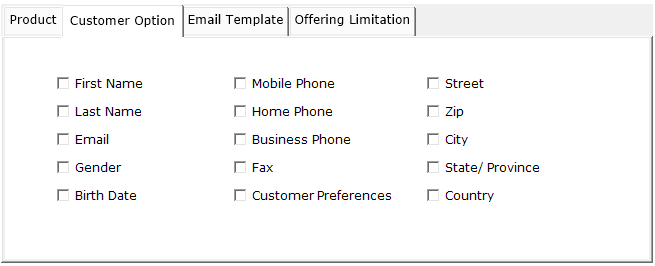
Note: The fields that are checked display on the CPS Data Collection Web Offer page, and will be required for the customer to complete.

Email Set Up
- Click the Email Template tab. The default templates display in the two drop-down fields.
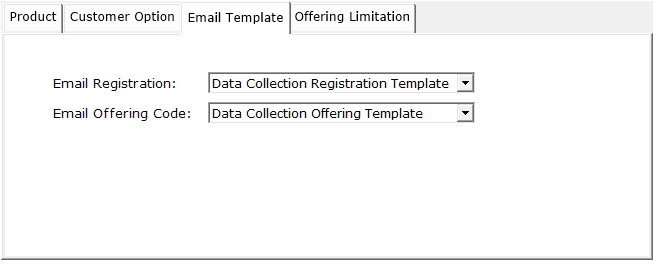
Note: You can change the wording of the email templates in the Email module or create a new one based on the original template. Also, anything that is in brackets is populated by the system. The default templates contain the following:
For the Registration
Note: This is the email the customer receives when they first enter their email address into the offer page.

For the Offering
Note: This is the email the customer receives with their offer after they have filled out the fields on the CPS Data Collection Web Offer page that collects their data.

Offer Limitations
- Click the Offering Limitations tab, and select one of the following radio buttons:
- New Customer Only to limit this offer to new customers.
- Limit and then enter the number in which to limit this offer per customer; then enter the number in the next Times per _____ field to limit this offer how on many times in relationship to your last selection in the drop-down field per Day, Month or Year.
- In the Offer Text box, type in the offer that you are offering in detail.
Note: This is the offer that the customer will see. You can format it using the tools at the top of the box, for example, you can bold and add color to your text.
- You may need to scroll down to the Web Offer Text box to enter the text for the offer; since it will be the same you can copy the text from the above box and paste it into this box. Note: Do not format the text as it does not appear on the web page formatted.
- Click Save. The offer displays in the list of offerings at the top of the management screen.
- In the Data Collection Configuration section, the following is available for the kiosk where the customer will come to redeem the offer, immediately on the web page.
- The URL for the website that is set up to collect the customer’s information. This is set up once by Club Prophet’s support team and should not need to be updated. This is the site or place that displays this offer and collects the initial information. An email is sent to the customer containing the coupon or bar code for their reward.
- In the Kiosk Data Collection Offer, select the offer you want to make current on the kiosk.
Note: Select the Enable to Swipe Drivers License checkbox if you are set up with a driver’s license scanner to allow your customers to swipe their driver’s license to enter their information automatically.
- Click OK. Now you are set up to collect data from your customers by offering them something in return.
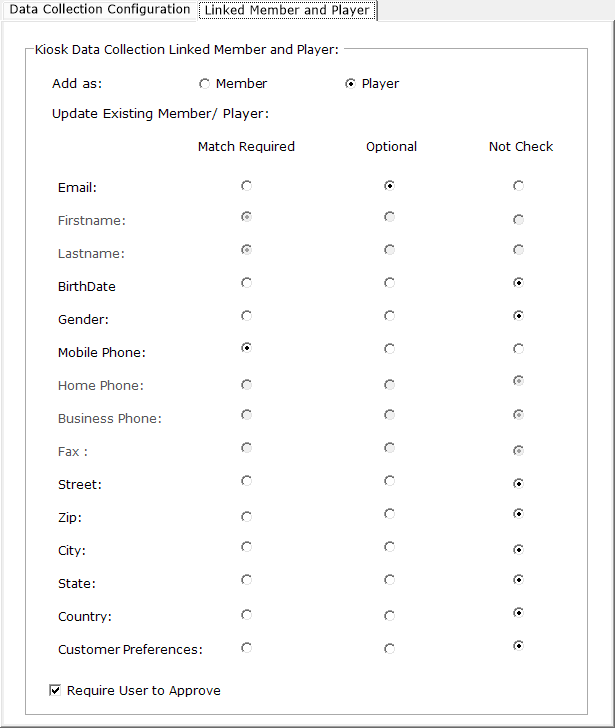
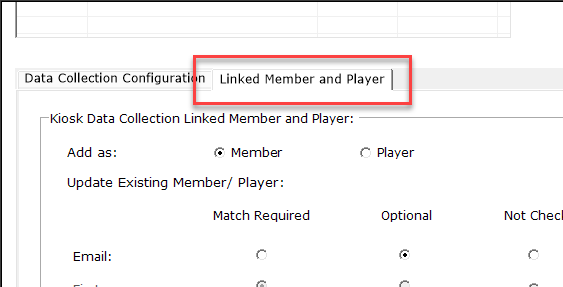
The Linked Member and Player tab
- Click the Linked Member and Player tab
- Select either the Member or Player radio button for how you would like the customer to be entered into your database.
- In the Update Existing Player section, select whether you want the system to update the database’s fields in the following manner:
- To ignore the input, select the Not Check radio button.
- To have a required match, select the Match Required radio button.
- If it does not matter, select the Optional radio button.
Using the Approval Waiting List option
If you would like to approve a customer to be added to the database, use the Approval Waiting List as follows:
Note: The customer will get the offer regardless of being in the approval waiting list but they will not be added to your database without your approval.
- In the Kiosk Data Collection Option Management screen, click the Linked Member and Player tab. There, you check the Require User to Approve checkbox. If this is checked, then everyone who registers will go onto the Approval Waiting List box for someone at your facility or golf course to review and release after they reviewed it.

To set up for approval
- Select Tools | Options, then select the plus sign [+] next to Kiosk Options. The Kiosk Options expands to reveal the options below it.
- Select Kiosk Data Collection Options. The management screen displays to the right.
- Click the Linked Member and Player tab.
- At the bottom of this screen, select the Require User to Approve checkbox.
- Select Save in the bottom right of the screen. Close the options screen. The next time a member or player responses to your kiosk prompt, these options will be in effect.
To approve a customer
- Click Approval Waiting List to the right of the offer list. The Kiosk Data Collection Member/Player Approval screen displays.

- If anyone has entered their email at the kiosk, they will be queued in the approval list under the Kiosk Data Collection Approval Waiting List.
- To add this name into your system, click the customer, then click Approve. They can now be found in your customer database.