Added a Post Date option to the Recurring Charge screen
In 3.98, you will find a new Post Date option in the Recurring Charge screen; it features the following:
-
A drop-down with 31 days in it to the Recurring Charge screen.
-
An option labeled Post Date.
-
The option defaults to 1. When changed from 1, the date of the recurring charge will show on a customer’s ledger as of the date you selected.
This new feature is good for recurring charges because the function normally runs and posts as of the 1st, and now you can change that.
For example, if you run your charges on the 10th and you would like it to show on the Customers Ledger on the 10th - it can now; if you run your billing on the 10th, it shows on the 10th.
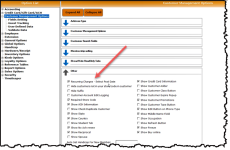
The new option to turn on the Post Date feature is found in Tools | Options | Customer Management Options | Customer Management |Other.
To set up for the Recurring Charge screen
Before set up, you need the following completed:
-
Private Billing is turned on. To learn how, click here>>
-
Billing contains charges; this causes the Recurring Charge tab to display in the Billing tab of a customer.
Note: The recurring charges that you build on that customer are only for that customer, so if you want to have the same charge on multiple customers, you'll have to go to each customer to set them up, unlike a Billing Code in Private Billing where you assign them to the customer class, and then everyone in the customer class gets them.
-
Go to Tools | Options | Customer Management Options | Other. The Customer Management Options screen displays to the right.
-
Select the Recurring Charges - Select Post Date checkbox, which is the first checkbox at the top.
-
Select Save and Close at the bottom right of the screen. Now the Recurring Charge tab will display in a customer’s information screen of the Customer module.
BEST PRACTICE: You should immediately close the software and login again for the changes to take place.
To set a customer up with a recurring charge
-
Go to the Customer module.
-
Look up the desired customer.
-
Select the Billing tab.
-
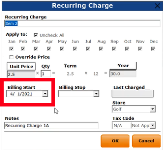
Select the Recurring Charges tab. The Recurring Charge screen displays.
-
Create or edit the charge.
-
Enter the necessary information for this charge, making sure you select the date from Billing Start drop-down.
-
Click OK.
To run the recurring charge
-
Go to the Sales module.
-
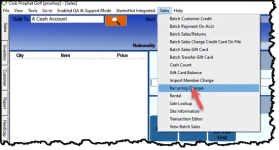
From the top of the screen using the toolbar, select Sales then Recurring Charges.
-
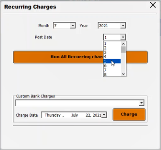
In the Recurring Charges screen, select the date you want to post using the Post Date drop-down field.
-
Select the Run All Recurring charges button. A prompt displays stating that it is running.
-
Click OK. When finished the recurring charge shows on a customer’s ledger as of the date you selected.
Shout out to Pam Scott @rtjgolf.co


