Setting up CPS Air on the iPad
Overview
After the CPS Air app has been installed, here are some of the set up procedures that need to be done before you can start using it:
-
Adjusting the iPad's keyboard setting to handle names with an apostrophe
-
To enable the iPad to charge via passthrough with the credit card sled connected.
To see a video of how to install and set up the backend of CPS Air, jump here>>
To set up the iPad as a terminal in POSExpress
If the iPad is new to CPS Air, then you must approve the device as a terminal on your local terminal running POS Express. If the iPad has already been approved in as a terminal, you do not need to do anything further because the settings remain the same.
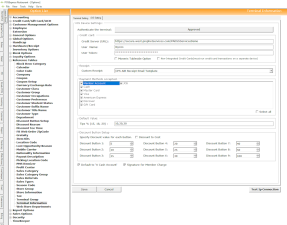
- Open POSExpress, then from the POSExpress menu, select Tools | Options | Reference Tables | Terminal Information. From this screen, you will approve the iPad as a terminal.
Note: If you do not see your the name of your iPad in the list of terminals, check the inactive terminal list by clicking the Status drop-down in the upper-right corner, and then select Inactive. If you iPad has the same name of another iPad, and the database you are connecting to already has an inactive iPad of the same name, the system will not add a new entry in the terminal list.
- To approve the iPad, select the terminal using the name of the iPad from this list.
- Select Store Code, if applicable. If you have more than one store, and you leave this field blank, you will be prompted during login to select a store.
- Go to iOS Settings tab at the top left of the Terminal Settings tab.
- Select the Approve button from the top of the screen to authenticate the device. This adds the iPad to the online license.
- Set all other applicable settings, including the credit card settings.
- When finished, select Save.
Setting up the Quick Sale Menu for the iPad Overview
The following are quick steps to get you started. For greater details on creating QSB for the iPad, jump here>>
-
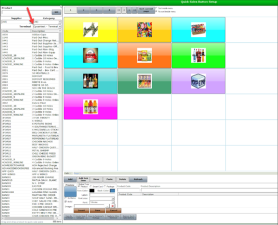
Go to Tools | Options | Sales Options | Quick Sales Button Setup.
-
Select the iPad terminal, and set up the quick sale keys.
Note: You can also copy quick sale keys from another terminal but only page 1.
For more details on creating CPS Air QSB, jump here>>
To learn how to copy QSB to your iPad from the POS Sales screen, jump here>>
To set functions in CPS Air for the users
-
Go to Tools | Options | Security | User Rules. The User Rules screen displays.
-
Enable the common user settings as needed:
-
Tee Sheet: This setting gives the user access to the tee times reservation sheet.
-
Returns Day of Only: This setting permits a return transaction for a sale completed that day.
Note: To see how to enable a User Rule for returns in CPS Air, jump here>>
-
Check Out Inventory Approval: This will set the supervisor's review of the checked out items on a beverage cart.
To learn how to set user's F&B security options, jump here>>
Related Topics for CPS Air
-
How to process sales>>
-
How to reserve tee times>>
-
How to use iPad to do your Bev Cart>>
-
To learn how to set up security and rules for the iPad running the 3.100+ verion of CPS Air, click here>> Note: For an older document on User Rules, see this document>>
-
For details on creating Quick Sale Buttons for your iPad running CPS Air>>
-
For details on F&B security options in CPS Air, jump here>>

